CentOS 7 搭建 L2TP VPN
发布时间:2024-07-26 22:17
更新时间:2024-07-26 22:20
一、L2tp 环境搭建
1、先看看你的主机是否支持pptp,返回结果为yes就表示通过
modprobe ppp-compress-18 && echo yes
2、是否开启了TUN,有的虚拟机主机需要开启,返回结果为cat: /dev/net/tun: File descriptor in bad state,就表示通过。
cat /dev/net/tun
3、安装EPEL源(CentOS7官方源中已经去掉了xl2tpd )
yum install -y epel-release
4、安装xl2tpd和libreswan(openswan已经停止维护)
yum install -y xl2tpd libreswan lsof
5、编辑xl2tpd配置文件
vim /etc/xl2tpd/xl2tpd.conf
[lns default]
ip range = 192.168.1.100-192.168.1.120 #分配连接客户端的地址
local ip = 192.168.1.3#本地内网IP,如果没有本地内网IP可以在外网IP上增加子接口
require chap = yes
refuse pap = yes
require authentication = yes
name = LinuxVPNserver
ppp debug = yes
pppoptfile = /etc/xl2tpd/xl2tpd.conf
length bit = yes
6、编辑pppoptfile文件
vim /etc/ppp/options.xl2tpd
ipcp-accept-local
ipcp-accept-remote
ms-dns  8.8.8.8
ms-dns  114.114.114.114
# ms-dns  192.168.1.1
# ms-dns  192.168.1.3
# ms-wins 192.168.1.2
# ms-wins 192.168.1.4
#name xl2tpd
#noccp
auth
#obsolete: crtscts
idle 1800
mtu 1410
mru 1410
nodefaultroute
debug
#obsolete: lock
proxyarp
connect-delay 5000
refuse-pap
refuse-mschap
require-mschap-v2
persist
logfile /var/log/xl2tpd.log
# To allow authentication against a Windows domain EXAMPLE, and require the
# user to be in a group "VPN Users". Requires the samba-winbind package
# require-mschap-v2
# plugin winbind.so
# ntlm_auth-helper '/usr/bin/ntlm_auth --helper-protocol=ntlm-server-1 --require-membership-of="EXAMPLE\\VPN Users"'
# You need to join the domain on the server, for example using samba:
# http://rootmanager.com/ubuntu-ipsec-l2tp-windows-domain-auth/setting-up-openswan-xl2tpd-with-native-windows-clients-lucid.html
7、设置用户名密码
vim /etc/ppp/chap-secrets
# Secrets for authentication using CHAP
# client        server  secret                  IP addresses
用户名1   * 密码 *    #可以增加多个用户,修改后重启ipsec和xl2tpd服务
用户名2   * 密码 *
# 格式为: 用户名  类型  密码  允许访问的ip
# 这个配置文件,也是pptpd的用户密码配置文件,直接类型上用*表示所有。因为这里我们只搭建l2tp/ipsec

8、修改内核参数
vim /etc/sysctl.conf
添加如下配置到文件中,参数后面不能有空格
net.ipv4.ip_forward = 1
net.ipv4.conf.all.accept_redirects = 0
net.ipv4.conf.all.rp_filter = 0
net.ipv4.conf.all.send_redirects = 0
net.ipv4.conf.default.accept_redirects = 0
net.ipv4.conf.default.rp_filter = 0
net.ipv4.conf.default.send_redirects = 0
net.ipv4.conf.eth0.accept_redirects = 0
net.ipv4.conf.eth0.rp_filter = 0
net.ipv4.conf.eth0.send_redirects = 0
net.ipv4.conf.lo.accept_redirects = 0
net.ipv4.conf.lo.rp_filter = 0
net.ipv4.conf.lo.send_redirects = 0
#有些参数没有加是由于服务器就一块网卡,没有eth1、eth2与ppp0的配置文件
#net.ipv4.conf.ppp0.accept_redirects = 0
#net.ipv4.conf.ppp0.rp_filter = 0
#net.ipv4.conf.ppp0.send_redirects = 0
修改完成后,加载内核参数使生效
sysctl -p
9、重启ipsec
systemctl restart ipsec
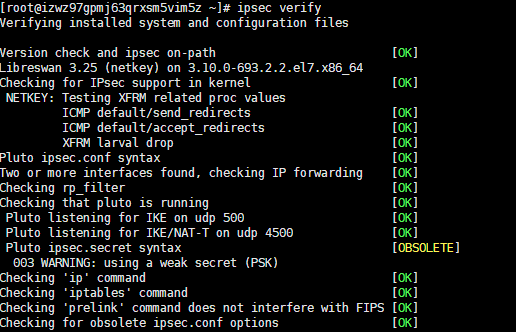
10、检查配置
ipsec verify

11、启动xl2tp
systemctl enable xl2tpd      # 设为卡机启动
systemctl start xl2tpd      # 启动xl2tp
已经是第一篇啦!